Art I
Art I is an introductory art course that focuses on the study and utilization of the elements of art (color, form, line, shape, space, texture, and value), the principles of design (balance, contrast emphasis, movement, pattern, rhythm, and unity), art criticism, art history, and the production of art. Students will express their visual creativity through a wide variety of studio disciplines, such as, but not limited to, design, drawing, painting, and a variety of three dimensional processes.
Instructions for Written Statement for Art I
Your written statement for first semester will be a written reflection on your project and the elements of art. Using YOUR artwork, you will describe the following: color, form, line, shape, space, texture, and value. Do NOT just put the element word in a sentence. You should be using descriptive words to explain the elements. You will complete a minimum of two sentences for each element.
Your written statement for second semester will be a written reflection on your project and the principles of design. Using YOUR artwork, you will describe the following: balance, contrast, emphasis, movement, pattern, rhythm, and unity. Do NOT just put the principle word in a sentence. You should be using element words and descriptive words to explain the principles. You will complete a minimum of two sentences for each element.
Your written statement for second semester will be a written reflection on your project and the principles of design. Using YOUR artwork, you will describe the following: balance, contrast, emphasis, movement, pattern, rhythm, and unity. Do NOT just put the principle word in a sentence. You should be using element words and descriptive words to explain the principles. You will complete a minimum of two sentences for each element.
First Semester
Project: Paper Relief Still Life (30 pts)
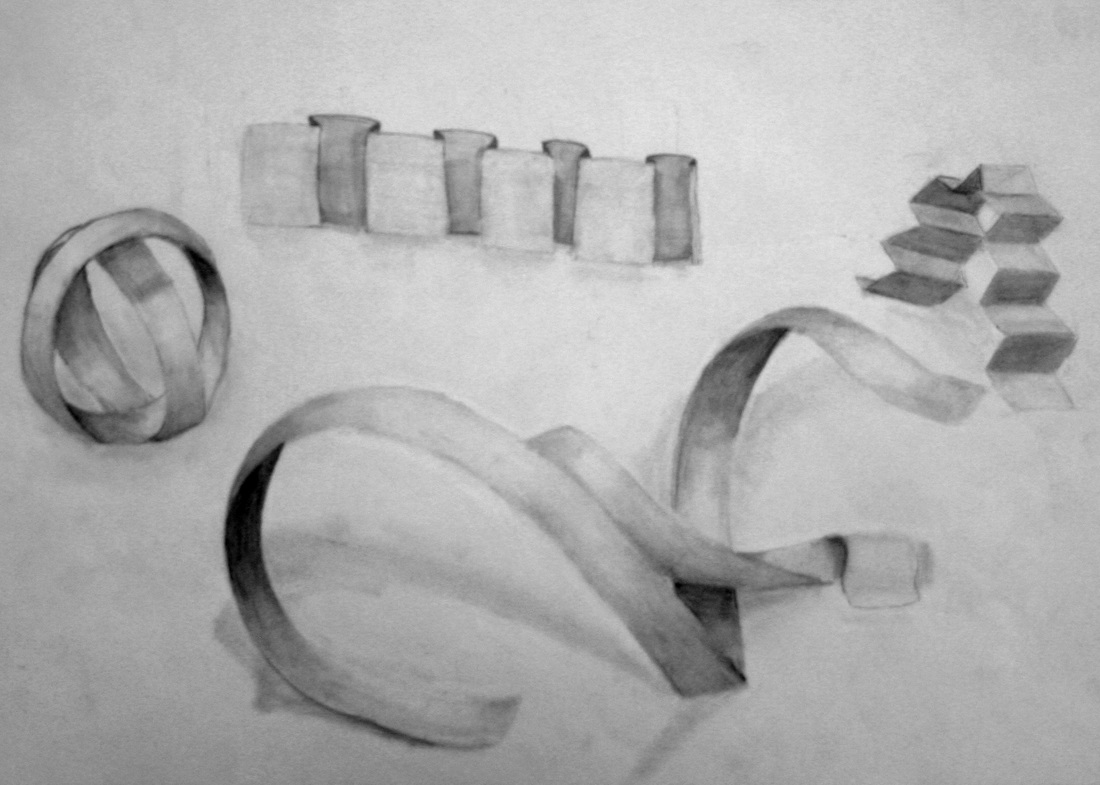
Prior to beginning your project, you will complete the following activities to build your technical skills in graphite: value strip of eight solid values, graduated value strip, sphere worksheet, cone, cube, loop, and zigzag forms that contain highlights, halftones, core of the shadows, reflective lights, and cast shadows. Your observation skills will be tested in this project as you create a three-dimensional paper sculpture out of altered white paper. You will use white paper for the base of the sculpture. Using at minimum six strips of paper, you will fold, twist, or roll the strips of paper to create a relief sculpture. Then you will accurately interpret the relief sculpture as a two-dimensional drawing. You will have to be focused on precisely what you see in front of you and not be distracted by preconceived ideas of how an object should look. You will begin with the form that is closest to you. Using a LIGHT contour line, you will begin to draw the part of the form that is closest to you. Follow the lines of the form as they recede in space and mock the lines on your paper. After the form is completely drawn out, begin adding value. You will first need to study the form and how the light hits the form. The areas of the form that are facing the light source are the brightest spots. Places facing slightly away from the light source are hit less directly and are not illuminated as brightly. Areas on the opposite side of the light source receive no illumination and fall into shadows. The intensity of light diminishes the farther it travels.
Your drawing should contain the following types of value:
Highlight
This is the lightest value seen on a form. It is most evident on smooth or shiny surfaces. Use the white of your paper for all of your highlights and use smooth blending between the highlights and the adjacent values.
Halftone
This is the entire area on the form facing the light source. It gradually darkens in value as it turns away from the light source. A halftone can be rendered darker or lighter depending on the form's true color and lighting.
Reflected Light
This is light that bounces back into the shadow from surrounding objects. It plays a big role in making forms look three-dimensional. Be careful not to render the reflected light too light. It should always be a darker value than any part of the form facing the light.
Core of the Shadow
This is the darkest value on the form. It appears as a band of darkness between the halftone and the reflected light. The core of the shadow gives many clues about the contours of the form, so it is important to render its shape correctly. On a sphere, the shape of the core of the shadow would be simple. On a bumpy rock, the shape of the core of the shadow would be irregular and complex.
Cast Shadow
This is the shadow cast by the form onto the ground plane or over other nearby forms. In general, the cast shadow is darkest at the point next to the form where it originates. As it travels away from the form it becomes lighter in value. Cast shadows vary in intensity depending on the lighting conditions. Diffused light creates light shadows with soft edges, while a concentrated light source produces dark shadows with crisp edges. Other value changes also can be seen in most cast shadows. Look at the cast shadows of your form for subtle changes in value to add more realism to your drawings.
When you have completed your artwork, you will reflect by filling out a written statement worksheet.
Before turning in your project for grading, you will apply formal critique steps to reflect on your artwork. You make the necessary changes to improve your artwork.
Want to learn more about other artists using still life as the subject of their artworks? Look up still lifes created by Caravaggio, Willem Kalf, Pieter Claesz, Henri Matisse, Giorgio de Chirico, Paul Cezanne, William Harnet!
Want to learn more about realistic drawing techniques? Check up the following books:
Barber, Barrington. Drawing Masterclass. Cincinnati, Ohio: Metro Books, 2012.
Hillberry, J.D. Drawing Realistic Textures in Pencil. Cincinnati, Ohio: North Light Books. 1999.
Parks, Carrie Stuart and Rick Parks. The Big Book of Realistic Drawing Secrets. Cincinnati, Ohio: North Light Books, 2009.
Learning Objectives and Evaluation Standards
You should be able to understand and apply the following skills/techniques:
- Create smooth, continuous value through even pressure to create highlights, halftones, reflected light, core of the shadow, and cast shadows.
- Create a range of six graduated values.
- Define edge through variations in pressure.
- Create an original drawing that utilizes still-life as a theme.
Project: Celtic Design (30 pts)
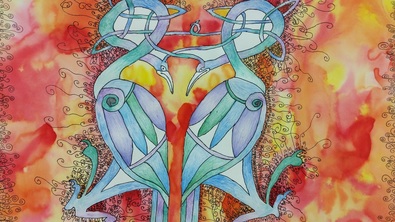
You will begin by exploring organic and geometric lines, shapes, and forms found in various art eras and cultures. As a class, we will explore Art Nouveau, Art Deco, and Celtic art. Using Celtic art for inspiration, you will create your own design based on the use of geometric and organic lines and shapes. Your line design should be about 1/2-inch thick and will fill up the length and width of your paper. You will select either warm color scheme (yellow, orange, red) or cool color scheme (violet, blue, green) for you design. You will fill in your design with colored pencils. Your colors will graduate in value and blend together. For example, if you are using a cool color scheme, you will begin with your violet and apply it from light to dark and back to light. You will begin your light blue on top of your dark violet and you will apply it from light to dark and back to light. Your dark blue will be on top of your last light violet. You will begin your light green on top of your dark blue and you will apply it from light to dark and back to light. Your dark green will be on top of your last light blue. You will continue this pattern until your design is completely filled in. You will utilize sharpies to outline your design and create ornate details around your design. Your negative space then will be painted with the opposite color scheme by utilizing a watercolor wash. Before you paint your background, you will practice using various sizes and types of brushes to create range of values, intensities, and new colors with the watercolor paints. After you have mastered the techniques, you will apply the watercolor techniques to the negative space in your artwork.
When you have completed your artwork, you will reflect by filling out a written statement worksheet.
Before turning in your project for grading, you will apply formal critique steps to reflect on your artwork. You make the necessary changes to improve your artwork.
Want to learn more about Celtic artwork? Look up artwork from the Book of Kells or check out the following books:
Celtic Designs. Mineola, New York: Dover Publications, 1997.
Sandison, David. The Art of the Celts. London: Bounty Books, 2005.
Learning Objectives and Evaluation Standards
You should be able to create a range of value by utilizing watercolor washes.
When you have completed your artwork, you will reflect by filling out a written statement worksheet.
Before turning in your project for grading, you will apply formal critique steps to reflect on your artwork. You make the necessary changes to improve your artwork.
Want to learn more about Celtic artwork? Look up artwork from the Book of Kells or check out the following books:
Celtic Designs. Mineola, New York: Dover Publications, 1997.
Sandison, David. The Art of the Celts. London: Bounty Books, 2005.
Learning Objectives and Evaluation Standards
- You should be able to identify and use geometric, organic shapes, and color theory.
- You should be able to apply the following skills/techniques:
You should be able to create a range of value by utilizing watercolor washes.
Project: Color Wheel Painting (30 pts)
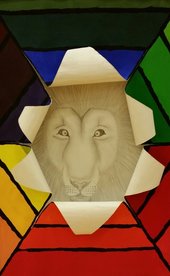
A color wheel is an abstract illustration of hues of color that form a circle. It shows the relationships between primary colors, secondary colors, complementary colors, and tertiary colors. You will create a unique version of a color wheel. You will begin your project by dividing up your paper in six equal sections. Each section will become a color on the color wheel (violet, blue, green, yellow, orange, and red.) You will pick one section and divide it up into five equal sections. You will paint a pure primary color in the middle. The sides of the primary color will be filled with its corresponding tertiary colors. Tertiary colors are created by mixing two primary colors together. You will complete this step for the other two primary colors. Make sure when you are applying the paint, you are creating a solid area of paint with no visible brushstrokes or change in color. After all of your primary colors are complete, you will begin mixing primary colors to create secondary colors. You will pick one section and divide it up into five equal sections. Paint the pure secondary color in the middle. The sides of the secondary color will be filled with its corresponding tertiary colors. You will complete this step for the other two secondary colors. You will outline all of your sections using black paint. Using your sections as a guide, you will cut and roll back the paper. Lastly, you will create a monochromatic design on a separate paper and tape it to the back of your color wheel.
When you have completed your artwork, you will reflect by filling out a written statement worksheet.
Before turning in your project for grading, you will apply formal critique steps to reflect on your artwork. You make the necessary changes to improve your artwork.
Want to learn more about other artists using monochromatic color schemes? Look up Picasso's Blue Period!
Learning Objectives and Evaluation Standards
- You should be apply to mix colors to create secondary colors, and tertiary colors to create solid areas of color (with no visible brushstrokes or change in color.)
- You should be apply to identify and use monochromatic color theory.
TAB Project (10 pts)
Teaching for Artistic Behavior (TAB) is a choice-based art education approach to teaching art. TAB enables you to experience the work as an artist through authentic learning opportunities and responsive teaching. A TAB project regards you as artist and offers you real choices for responding to your own ideas and interests through making of art. As a class, we will complete mini workshops based in a variety of media. The media workshops will be graphite, pastel, and, oil pastel. At the end of the workshops, you will pick a medium that you would like to explore. You will receive a handout reiterating the key points of working with that medium. You begin with creating goals for working with your medium of choice in a journal. Next you will be starting to explore your medium of choice. At the end of each class you will complete a self-assessment by changing or add new goals for the next day in your journal. Rubrics for your medium choice will be given to you at the beginning to help guide you through planning and achieving your goals in your medium choice.
Before turning in your project for grading, you will apply formal critique steps to reflect on your artwork. You make the necessary changes to improve your artwork.
Learning Objectives and Evaluation Standards
Before turning in your project for grading, you will apply formal critique steps to reflect on your artwork. You make the necessary changes to improve your artwork.
Learning Objectives and Evaluation Standards
- See instructor for individualized learning objectives and evaluation standards.
Second Semester
Project: Elements & Principles Origami Star (20 pts)

You will create an origami star while learning about the principles. Principles are how the elements are organized. You will design six pieces of paper based on the following principles of design: Balance, Contrast, Emphasis, Movement, Pattern, and Rhythm. You will draw a design on the front and on the back of the paper that reflects the characteristics of the principle that we are working on for that day. (For example, for contrast you could have line contrast on one side and the other side could have value contrast.) After you have drawn your design, you will add color with colored pencils. When all six papers are complete (front and back) you can begin folding your papers. Fold one paper at a time. Begin by folding each page in half horizontally. Then open up each paper and fold it in half vertically. You should be PERFECTLY matching the corners each time. Unfold the papers. You will notice that two of the corners will be sticking up, fold those corners to the bottom corner and press paper flat. Stack all six folded pages in the order you want. All of your openings should be facing the same way. Using a thin layer of glue around the edges, glue and press pages firmly together. Using the small cut paper; draw a design cover for each side of your star and color it in. Cut two pieces of tag board for each side of your star. Glue down your designs. Cut the corners of the designs to meet with the tag board. Fold and glue the paper down. Cut off the extra paper on the ends. Glue one cover on each end of your stacked papers. Between the cover of the star and the first page, glue a ribbon. (Make sure you glue it on the corner that opens.) Repeat the step between the cover and the back page of the star.
When you have completed your artwork, you will reflect by filling out a written statement worksheet.
Before turning in your project for grading, you will apply formal critique steps to reflect on your artwork. You make the necessary changes to improve your artwork.
Want to learn more about origami techniques? Check out the following books:
Temko, Florence. Origami Magic. New York: Scholastic Inc., 1993.
The Book of Amazing Origami Creations. China: Flying Frog Publishing, 2007.
Learning Objectives and Evaluation Standards
- You should be able to identify and use all the elements of art and principles of design to create ornate designs.
- You should be able to identify the following: formal balance, informal balance, emphasis through contrast/ convergence, regular and progressive rhythm.
- You should be able to create a form by layering and adhering materials.
Project: Ceramic Sculpture (20 pts)
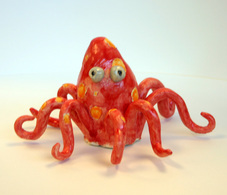
You will begin by practicing the following hand building processes in clay: pinch, coil, and slab. Picking your favorite process, you will design and build a sculpture. Remember to wedge the clay correctly before beginning your sculpture. (Points will be taken off if your project breaks during the firing process.) Build up your sculpture making sure you follow these guidelines: clay should be no thicker than your thumb and no thinner than your pinky finger, all attached pieces should be slipped and scored, and lastly, your initials should be carved into the bottom of your sculpture.
Before turning in your project for grading, you will apply formal critique steps to reflect on your artwork. You make the necessary changes to improve your artwork.
Want to learn more about hand-building techniques in clay? Check out the following book:
Atkin, Jacqui. Handbuilt Pottery Techniques Revealed. Canada: Barron's Educational Series, Inc., 2013.
Learning Objectives and Evaluation Standards
- You should be able to use correct wedging and joining techniques.
- You should be able to create an artwork using a hand building process (pinch, coil, and slab).
- You should be able to demonstrate uniform thickness throughout the piece.
Project: Landscape Relief (30 pts)
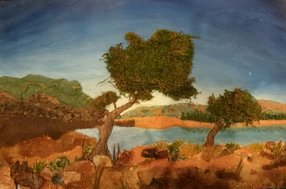
You will begin by selecting a landscape image. (The image must be approved before starting the project.) Using canvas paper and a pencil, you will draw the outline of the landscape. Do not worry about the details of the texture. You should focus on the placement and size of the different elements of your landscape. You will begin building up your relief by working from the top of your paper (your sky.) Think about what kind of texture you are trying to achieve, and what materials would mock that texture. Everything can be made out of different types of paper (tissue paper, paper towels, or regular white paper.) You are welcome to use other materials as well (such as pine needles, Spanish moss, sand, and pencil shavings.) After you create the simulated texture, you will paint the area by matching the observed hues. Remember to create and paint one section at a time, by working from the top (the sky or background) to the bottom of your paper (the foreground.) Remember to use the size and type of brush for each of your sections.
When you have completed your artwork, you will reflect by filling out a written statement worksheet.
Before turning in your project for grading, you will apply formal critique steps to reflect on your artwork. You make the necessary changes to improve your artwork.
Learning Objectives and Evaluation Standards
- You should be able to use media in various ways to create real and simulated texture.
- You should be able to create a low/high relief by layering and adhering fibers and found media.
- You should be able to identify and use techniques to create the illusion of space (overlapping, size, detail, placement, texture and value contrast).
- You should be able to mix paint to create a range of values and levels of intensity.
- You should be able to create original artwork that using landscape and nature as a theme.
Project: Pastel Collage Portrait (15 pts)
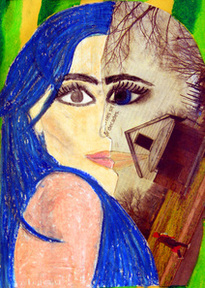
You will begin with a group discussion about facial portions. As a class, we will work through each section of the face. You will draw a face using white paper and pencil. The person sitting across from you will become your model. You will focus on placement and size of each element of the face. After you have completed the face, you will add ears, a neck, and hair. Lastly, you will correctly add value to the face. (Remember to push your value so that you at least have six shades.) Put your drawing to the side and grab a piece of newspaper. (Look for really interesting patterns or words on the newspaper.) Using the newspaper, you will draw the face in profile. Focus on the portions and try to make the face the same length as your other face. (You are welcome to begin by measuring your other face and marking out the length on your newspaper.) You will use the person on the side of you for your profile model. You will focus on the placement and the size of each of the elements on the face. After you have completed the profile face, you will add ears, a neck, and hair. Do not worry about the value. Cut out both faces. Next, you will pick your favorite color of construction paper. Using a glue stick, glue down the first face in the middle of the construction paper. Next, you will layer the newspaper profile on top of the first face. Line up the top of the head and the bottom of the chin, and then glue it into place. Using oil pastels, you will add color to your profile and to the background. Get creative with your face and try to make it look abstract. Your background can be creative designs. Remember to utilize colors schemes, such as complementary color or analogous colors.
Before turning in your project for grading, you will apply formal critique steps to reflect on your artwork. You make the necessary changes to improve your artwork.
Learning Objectives and Evaluation Standards
Before turning in your project for grading, you will apply formal critique steps to reflect on your artwork. You make the necessary changes to improve your artwork.
Learning Objectives and Evaluation Standards
- You should be able to use correct facial portions
- You should be able to use six graduated values.
- You should be able to use color theories.
TAB Project (10 pts)
Teaching for Artistic Behavior (TAB) is a choice-based art education approach to teaching art. TAB enables you to experience the work of the artist through authentic learning opportunities and responsive teaching. A TAB project regards you as artist and offers you real choices for responding to your own ideas and interests through making of art. As a class, we will complete mini workshops based in a variety of media. The media workshops will be graphite, pastel, and, oil pastel. At the end of the workshops, you will pick a medium that you would like to explore. You will receive a handout reiterating the key points of working with that medium. You begin with creating goals for working with your medium of choice in a journal. Next you will be starting to explore your medium of choice. At the end of each class you will complete a self-assessment by changing or add new goals for the next day in your journal. Rubrics for your medium choice will be given to you at the beginning to help guide you through planning and achieving your goals in your medium choice.
Before turning in your project for grading, you will apply formal critique steps to reflect on your artwork. You make the necessary changes to improve your artwork.
Learning Objectives and Evaluation Standards
Before turning in your project for grading, you will apply formal critique steps to reflect on your artwork. You make the necessary changes to improve your artwork.
Learning Objectives and Evaluation Standards
- See instructor for individualized learning objectives and evaluation standards.
