Art II
Art II is an advanced art course for students that have successfully completed Art I. Art II builds upon and expands the knowledge and skills previously acquired in Art I through art criticism, art history, and the production of art. Students will express their visual creativity through a wide variety of studio disciplines, such as, but not limited to, design, drawing, fiber arts, painting, printmaking, and a variety of three dimensional processes. Portfolio development will be introduced and students will begin to establish materials for their portfolios.
Instructions for Written Statement for Art II
A written statement is an essay written by the artist that describes his or her artwork. Statements provide viewers who are unfamiliar with the artist (such as the college representatives, gallery owners, museum curators, and journalists) an introduction to the work. The statement also serves as a tool for the artist to learn more about where his or her work comes from and where it might lead.
1st Paragraph
Your first paragraph should describe your artwork as if the viewer was blind. Describe the subject, medium, placement, size, scale, and style. You should describe everything that is in the artwork (all the details including symbolism, clothing, hairstyles, and expressions). When you are describing what you see, you should be utilizing the elements (color, form, line, shape, space, texture, and value) and principles (balance, contrast, emphasis, movement, pattern, rhythm, and unity) of design. Organize your observations in a logical order.
2nd Paragraph
In your second paragraph, you should discuss your thoughts, feeling, inspiration, and/or position for creating the artwork. You should discuss what the main idea behind the artwork, the overall meaning of the work. Discuss the evidence that supports the main idea. The evidence should be within the artwork (what you see that supports your thoughts) and it may also be outside the artwork (in your culture, society, and/or life). Think to yourself, “What associations/conclusions do I hope the viewers make when viewing my work?” It is important to fully explain your thoughts because otherwise the meaning of the artwork will vary from viewer to viewer.
Both paragraphs should include a topic sentence, supporting information, and a concluding sentence.
First Semester
Project: Oil Pastel Still-Life (20 pts)
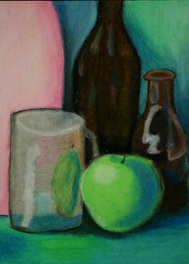
A still-life is a work of art that depicts a subject matter of common, everyday objects. Using everyday objects, you will set up a still-life. When setting up your still-life organize your objects to create a compositional balance by making sure the visual weight is distributed somewhat equally. When drawing your still-life, you will start with the object closest to you. Using oil pastels and starting with the object closest to you, begin sketching out the placement of all of your objects. Do not start your drawing with a black oil pastel. It will contaminate the purity of any colors that are applied over the top. Test different colors to see which one blends well with the other colors that you will be using for your still-life. Next, block in with color the background. Start with your lightest color and work your way up to darkest color. (Don't use black.) You can use warm colors for the highlights and cool colors for the shadows. Apply your color by using vertical strokes to create simulated texture. Blend the oil pastels with a tissue or by layering pastels on top. Next, block in your foreground. Start with your lightest color and work your way up to your darkest color. (Don't use black.) Apply your color by using horizontal strokes to create simulated texture. Blend oil pastels with a tissue or layering oil pastels on top. Begin adding color to the object furthest away. You can block in the areas with shadow with a brown. (Don't use black.) Next, you can worked in whites and warm colors for the highlights. (Remember to work lightest to darkest.) For the brightest areas and the reflects, leave the white of the paper. In addition, you can take a white oil pastel and blend it over your highlights. Use cool colors for your shadows. When you are building up the layers of color and the oil pastels become to thick, the areas will resit the application of more color. If this happens you can scrape off the excess and then apply the fresh color. Work your way through all of your objects paying close attention to the value and texture of your objects. Remember to start in with the objects furthest away and work your way up to the objects in the foreground. For the last step, go back and adjust the balance of the drawing by adding more of a contrast between the light and the dark areas. When you completely done with adding color, you will go back and add black were it is needed.
Before turning in your project for grading, you will apply formal critique steps to reflect on your artwork. You make the necessary changes to improve your artwork.
Want to learn more about other artists using the oil pastels? Look up Mary Cassatt, Jean Francois Millet, and Edgar Degas!
Learning Objectives and Evaluation Standards
You should be able to use the following techniques to create a still-life:
- Use the white paper for highlighted areas.
- Use white or light oil pastels to create light values.
- Use dark oil pastels to create dark values.
- Layer colors for halftones.
- Use black correctly so it did not contaminate the other colors.
Project: Mixed Media Identity Portrait (30 pts)
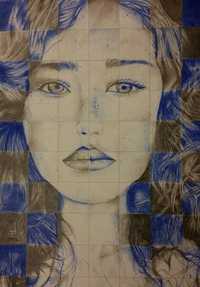
You will create a portrait based on the grid method. The grid method is a way to reproduce and/or enlarge an image. The grid method involves drawing a grid over your reference image, and then drawing a grid of equal ration on a larger piece of paper. You will start by finding an image of a face. The image should completely fill the negative space of an 8.5 by 11 piece of paper. Your image should have clear lines, shapes, and value. (You can't use an image that is pixelated.) You will begin by drawing a grid on your reference image, each square will be 1 inch. To draw the grid, put your rule at the top, left side of your paper, and make a small mark at every inch across the top of your paper. Place your ruler at the bottom, left side of your paper and make a small mark at every inch across the bottom of your paper. Then use your ruler to make a straight line connecting each dot at the bottom with it's partner at the top. Next, place the ruler on the top, left side of the paper, and make a small mark at every inch going down the left side of your paper. Then, place your ruler on the top, right side of the paper, and make a small mark every inch going down the right side of your paper. Lastly, use your ruler to make a straight line connection each dot from right side of the paper to the left side of the paper. Your grid is complete for your reference image. Repeat the same procedure on your larger paper using 1.5 inch squares.
When you draw the image on the larger paper, you will focus on one square at a time. You are trying to copy exactly what you see in that one square. You are looking at the lines and shapes of the image and not the image itself. Focus on the placement of each line or shape in each square until the entire image has been transferred. If you are right handed, you will start at the top, left corner of your paper. If you are left handed, you will want to start in the top, right corner of your paper. After the image is transferred, you will add value. Using a checker pattern, you will fill in the squares with graphite and colored pencils. You will use hatching, cross-hatching, and/or stippling to create simulated textures. In your graphite squares, you should use at least seven values. In your colored pencil squares, you should layer the colors to create value. Remember you can use your eraser and stumps to create or modify value.
When you have completed your artwork, you will reflect by creating a written statement.
Before turning in your project for grading, you will apply formal critique steps to reflect on your artwork. You make the necessary changes to improve your artwork.
Want to learn more about other artists using the grid method? Look up Albrecht Durer, Chuck Close, and Egyptian tomb painting!
Want to learn more about drawing realistic portraits? Check out the following books:
Barber, Barrington. Drawing Masterclass. Cincinnati, Ohio: Metro Books, 2012.
Hillberry, J.D. Drawing Realistic Textures in Pencil. Cincinnati, Ohio: North Light Books. 1999.
Hogarth, Burne. Drawing the Human Head. New York: Watson-Guptill Publications, 2002.
Parks, Carrie Stuart and Rick Parks. The Big Book of Realistic Drawing Secrets. Cincinnati, Ohio: North Light Books, 2009.
Learning Objectives and Evaluation Standards
- You should be able to create an original artwork that utilizes portrait and identity as a theme.
- You should be able to use a grid to create correct proportions.
- You should be able to use seven values in graphite to create simulated texture.
- You should be able to layer colored pencils to create simulated texture.
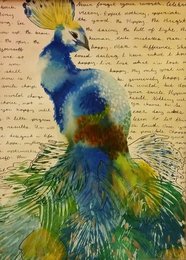
Project: Contour Lines and Watercolor Washes (20 pts)
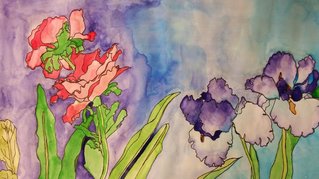
Using a feather or a flower, you will create a contour line drawing. Your drawing will focus on the mass and volume of the subject by using a single line. You will begin your contour line drawing by starting with the part of the object that is closest to you. Think about where you are starting on your paper. You want the flower or feather to be the focal point, so begin your drawing where the flower or feather will be balanced. Your focus will be on the object you are trying to draw. You should be looking at the object more often than the paper you are drawing on. This will help you see the "outlines" of your subject. As your eyes move across the outline of your object, you will mimic the line on your paper. The line should be a single line at all times (not gesture lines.) You will have the details of your object but do not create the value of the object. You will outline your drawing with Extra Fine Sharpie markers. You will add local color by using watercolor. You will apply the watercolor to create simulated and invented textures. Some techniques you may utilize to create simulated and invented textures are creating a soft edge, lifting out wet paint, lifting/scratching out dry paint, creating blooms of color, continuous washes, and/or graduated washes. The simulated texture will be on the feather or flower. The invented texture will be in the background. When creating your background use color schemes that creates unity with the local color of your subject. Remember to select and use appropriate size and brush types to create your texture.
Before turning in your project for grading, you will apply formal critique steps to reflect on your artwork. You make the necessary changes to improve your artwork.
Want to learn more about other artists using watercolor paints? Look up watercolor paintings created by Zoltan Szabo, Frank Wilson, John Singer Saregent, John Pike, and Eliot O'Hara!
Learning Objectives and Evaluation Standards
- You should be able to create an original artwork that utilizes still life as a theme.
- You should be able to apply watercolor to create simulated and invented texture.
Project: Scratch Art (20 pts)
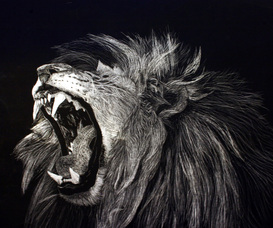
To begin your scratch art you will select an image of animal of your choice that has fur or hair of some sort. You will begin by trying to recreate the simulated texture of your animal by studying and drawing the length, width, and line direction of the fur. You can create the simulated texture by utilizing hatching, crosshatching, or stippling techniques. When you have mastered the technique, you will notice a progress rhythm with the lines that will create the illusion. Once you have down the simulated texture, you will practice the use of value on a piece of scratch board. Remember that it is the opposite of drawing. For a lighter value, you scratch away more of the board. For the darker values, you will scratch away very little or leave the board black. After you practice the values of the simulated texture, you will begin on your final project. Start by lightly drawing out your animal, and complete by scratching away parts of the board to create the simulated texture of your animal.
Before turning in your project for grading, you will apply formal critique steps to reflect on your artwork. You make the necessary changes to improve your artwork.
Want to learn more about other artists using similar techniques as scratch art? Look up prints by Albrect Durer, Hans Baldung Grien,Caspar David Friedrich, Katsushika Hokusai, and Edvard Munch! (Scratch art is a modern version of the 19th century scraper board and the scraper board became a popular medium for reproduction because it replaced wood and linoleum printmaking.)
Learning Objectives and Evaluation Standards
- You should be able to create a range of values by using hatching, cross-hatching, and/or stippling techniques.
- You should be able to create simulated textures from observation.
Project: Analytic Cubism (10 pts)
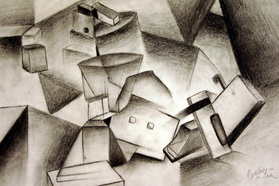
Cubism is a style of art invented by Pablo Picasso in 1905. Picasso was looking for a new way to formally (use of elements and principles) to express his ideas. He began to study 5th century sculpture, medieval art, and African sculpture. From his research, Picasso began to redefine objects by drawing the objects as lines, angles, and cubes which became known as Analytical Cubism. To begin your project, you will begin by creating a still-life. Using graphite, you will begin drawing each object. Each object will be reinvented using only lines, angles, and cube like shapes. You will have multiple points of view for the same objects. Every object that you draw will be on the same plane (no use of space.) It is about inventing and not just copying what you see. In addition to drawing the objects, you will also add value. Continue to invent your still-life until you have filled up your paper.
Before turning in your project for grading, you will apply formal critique steps to reflect on your artwork. You make the necessary changes to improve your artwork.
Want to learn more about other artists that use cubism techniques? Look up artworks created by Pablo Picasso, Georges Braque, and Paul Cezanne!
Learning Objectives and Evaluation Standards
- You should be able to create an artwork utilizing still-life and cubism as a theme.
- You should be able to use a range of eight values.
- You should be able to use an eraser and blending tools to create and modify value.
- You should be able to identify and use complex shapes to create compositional balance.
Second Semester
Project: Mask (30 pts)
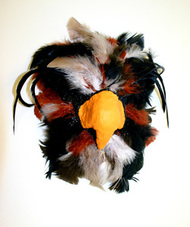
To begin your project, you will research one of the following:
Before turning in your project for grading, you will apply formal critique steps to reflect on your artwork. You make the necessary changes to improve your artwork.
Want to learn more about masks? Look up SLAM's collection on Native American masks and African masks or check out the following books:
Lechuga, Ruth D. and Chloe Sayer. Mask Arts of Mexico. San Francisco, CA: Chronicle Books, 1994.
Nunley, John W. Masks Faces of Culture. New York, NY: Harry N. Abrams, 1999.
Stepan, Peter. Spirits Speak: A Celebration of African Masks. New York, NY: Prestel, 2005.
Wyatt, Gary. Spirit Faces: Contemporary Masks of the Northwest Coast. Vancouver, Toronto: 1994.
Learning Objectives and Evaluation Standards
- Greek & Roman Masks
- Chinese Masks
- Japanese Masks
- African Masks
- Native American Masks
- Masks as Art & Fashion
Before turning in your project for grading, you will apply formal critique steps to reflect on your artwork. You make the necessary changes to improve your artwork.
Want to learn more about masks? Look up SLAM's collection on Native American masks and African masks or check out the following books:
Lechuga, Ruth D. and Chloe Sayer. Mask Arts of Mexico. San Francisco, CA: Chronicle Books, 1994.
Nunley, John W. Masks Faces of Culture. New York, NY: Harry N. Abrams, 1999.
Stepan, Peter. Spirits Speak: A Celebration of African Masks. New York, NY: Prestel, 2005.
Wyatt, Gary. Spirit Faces: Contemporary Masks of the Northwest Coast. Vancouver, Toronto: 1994.
Learning Objectives and Evaluation Standards
- You should be able to meet the objectives for your presentation.
- You should be able to create a complex mask by layering and adhering materials.
Project: Ceramic Relief Sculpture (20 pts)
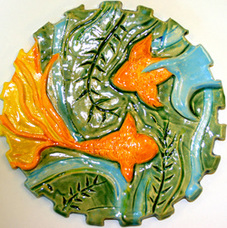
To begin the project, you will explore the artworks of David Stabley and Emily Boland. Both artists create relief sculptures from clay. (A relief is a sculpture that projects from a flat background.) You will analyze the artworks based on the following:
Subject- the narrative
Relief Process- additive, subtractive, and sunken
Composition- foreground, middle ground, background.
Next, you will develop a design on paper that tells a story about an event in your life. The design will include a foreground, middle ground, and background. Your design will also include at least two relief processes (i.e. additive, subtractive, or sunken.) You will begin preparing your clay by wedging your clay to prevent air pockets. Next, you will roll out your clay using a rolling pin and two wooden slats. You will place your design on top of the clay. With a needle tool or a toothpick, use the dot-to-dot method to poke through the paper into the clay, tracing all the main outlines of your design. Begin creating your design by using the relief processes. When carving (subtractive process) you can let the clay dry a little to make the carving process easier. When you are complete, go back and clean up your design using different sizes of paintbrushes and water. After drying and firing, you can paint your projects either with acrylic paint or glaze.
Before turning in your project for grading, you will apply formal critique steps to reflect on your artwork. You make the necessary changes to improve your artwork.
Learning Objectives and Evaluation Standards
- You should be able to correctly wedge clay to prevent air pockets.
- You should be able to create a relief using creative and complex additive, subtractive, and sunken relief techniques.
Project: Mixed Media Monoprint (20 pts)
A monoprint is a form of printmaking that the images can only be produced once (unlike most printmaking, where multiple images can be produced.) You will use the monoprint as a process to create invented textures for your artwork. You will begin by a selecting poem. (You are welcome to write your own poem.) The poem will become your inspiration for artwork. After you decide on your poem, circle words or phrases that sum up your poem. Using your circled words, create a design or image that could represent your words. At some point you should work your words in your artwork. Next, you begin to practice monoprint process. Using a plastic tray, apply paint to the tray. Once you have your paint where you want it, you will slowly press down a piece of paper on top of your paint. Practice the process until you get the desired results for invented texture. Next, you will create your design or images using monoprinting, painting, and possibly collaging. You are welcome to use sharpies to add details to your design or image.
Before turning in your project for grading, you will apply formal critique steps to reflect on your artwork. You make the necessary changes to improve your artwork.
Want to learn more about other artists using techniques in printmaking? Look up prints by Albrect Durer, Hans Baldung Grien,Caspar David Friedrich, Katsushika Hokusai, and Edvard Munch or check out the following book:
Allison, Sandy. Block Printing: Basic Techniques for Linoleum and Wood. Mechanicsburg. PA: Stackpole Books, 2011.
Learning Objectives and Evaluation Standards
- You should be able to create a monoprint as part of the process to convey the meaning or theme of the written word.
Project: Synthetic Cubism (30 pts)
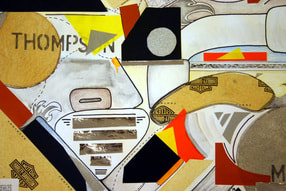
Synthetic Cubism is the second phase of Cubism and it uses mixed media. Synthetic cubism is similar to Analytic Cubism because the artist is trying to reinvent the objects using lines, angles, and cubes. In addition, multiple points of view and value is also used in Synthetic Cubism. In addition, Synthetic Cubism uses cube like shapes from paper scraps and also stenciled lettering. You begin your project by picking an image of an object. Just like your Analytic Cubism project, you begin by drawing out each part of your object by reinventing it using lines, angles, and cubes. In addition to the drawing, you will add paper scraps for different parts of your objects. Next, you will add stencil lettering using stencils. Lastly, you will add color with colored pencils and watercolor.
When you have completed your artwork, you will reflect by creating a written statement.
Before turning in your project for grading, you will apply formal critique steps to reflect on your artwork. You make the necessary changes to improve your artwork.
Want to learn more about other artists that use cubism techniques? Look up artworks created by Pablo Picasso, Georges Braque, and Paul Cezanne!
Learning Objectives and Evaluation Standards
- You should able to use a range of eight values.
- You should be able to use an eraser and blending tools to create and modify value.
- You should be able to identify and use complex shapes to create compositional balance.
- You should be able to mix paint to observed hues.
- You should be able to apply paint to create simulated and invented textures.
