Art III
Art III is an advanced art course for students that have successfully completed Art II. Utilizing art criticism, art history, and the production of art, Art III expands on the concepts and manipulation of the elements and principles of design within artwork, while placing emphasis on the students' development of individual styles and interests. Students will continue to build their portfolios that will reflect their technical skills and individual styles by exploring a variety of concepts and media.
Instructions for Written Statement for Art III
A written statement is an essay written by the artist that describes his or her artwork. Statements provide viewers who are unfamiliar with the artist (such as the college representatives, gallery owners, museum curators, and journalists) an introduction to the work. The statement also serves as a tool for the artist to learn more about where his or her work comes from and where it might lead.
1st Paragraph
Your first paragraph should describe your artwork as if the viewer was blind. Describe the subject, medium, placement, size, scale, and style. You should describe everything that is in the artwork (all the details including symbolism, clothing, hairstyles, and expressions). When you are describing what you see, you should be utilizing the elements (color, form, line, shape, space, texture, and value) and principles (balance, contrast, emphasis, movement, pattern, rhythm, and unity) of design. Organize your observations in a logical order.
2nd Paragraph
In your second paragraph, you should discuss your thoughts, feeling, inspiration, and/or position for creating the artwork. You should discuss what the main idea behind the artwork, the overall meaning of the work. Discuss the evidence that supports the main idea. The evidence should be within the artwork (what you see that supports your thoughts) and it may also be outside the artwork (in your culture, society, and/or life). Think to yourself, “What associations/conclusions do I hope the viewers make when viewing my work?” It is important to fully explain your thoughts because otherwise the meaning of the artwork will vary from viewer to viewer.
Both paragraphs should include a topic sentence, supporting information, and a concluding sentence
First Semester
Project: Foreshorten Figure Drawing (30 pts)
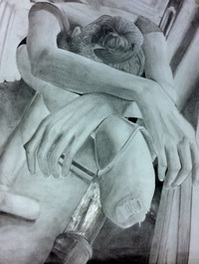
You will begin studying the human figure by exploring the use of gesture lines. A gesture is an expressive movement. The purpose of creating a gesture drawing is to capture the feeling of a motion. A gesture drawing does not focus on details. Lines showing gestures are quickly drawn. The implied lines are sketchy and loose. The concentrate is on understanding the implied shape, position, and movement of the human figure. Using a partner as a model, you will complete quick gesture drawings. Make note that the proportions of your subject may become distorted because of foreshortening. Foreshortening is to shorten an object, or part of your subject to make it look as if it extends backward in space.
You will begin the project by researching different artists that use the human figure as a subject. You will analyze how the position of the figure can be foreshorten to give the illusion of form. In addition, the position, or pose can help push forward a concept within the meaning of the artwork. Thinking about your own identity, you will decide on a pose. Think about what the pose is expressing. For example, if you are passionate about running, you could be sitting down and stretch out like you would do before a race. I will photograph you in your pose with a strong light source focused on your focal point of your body. You will print out the image and begin drawing. (If you are absent, you are welcome to have a friend photograph you and print it out.) You will create a range of at least ten values for your simulated textures.
When you have completed your artwork, you will reflect by creating a written statement.
Before turning in your project for grading, you will apply formal critique steps to reflect on your artwork. You make the necessary changes to improve your artwork.
Want to learn more about realistic drawing techniques? Check up the following books:
Barber, Barrington. Drawing Masterclass. Cincinnati, Ohio: Metro Books, 2012.
Hillberry, J.D. Drawing Realistic Textures in Pencil. Cincinnati, Ohio: North Light Books. 1999.
Parks, Carrie Stuart and Rick Parks. The Big Book of Realistic Drawing Secrets. Cincinnati, Ohio: North Light Books, 2009.
Learning Objectives and Evaluation Standards
- You should be able to create a graphite drawing using the human figure to represent an aspect of your identity.
- You should be able to utilize at least ten values for your simulated texture.
Project: Landscape Pastel Drawing (20 pts)
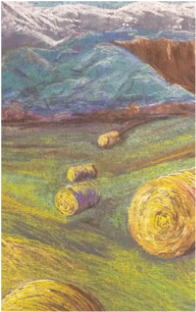
You will complete a landscape drawing by using pastels. A pastel is finely-grounded color in a powdery substance that is blinded together in a stick form. When working with pastels you will use a special paper that has a rough surface. The rough surface aids in grabbing and holding the pastel pigment. The rougher the surface, the more pastel the paper can hold. Pastel papers are available in a range of colors. The color of the paper will affect the look and feeling of your drawing. For example, cool, dark papers can evoke a dramatic feeling, while lighter, warmer colors may create a more lighthearted feeling. Other additional pastel tools are paper towels, blending tools, and fixatives. Paper towels are perfect for cleaning pastels, your hands, and for blending colors together. Other blending tools can be your fingers or any other blending tools you use for graphite drawings. Fixatives, like hairspray, can be used to set a layer of pastel so it can no longer be blended.
When creating an image with pastels, there are many different techniques you can employ for simulated texture. You can use the following the implied line or stroke techniques: broad strokes, round strokes, and linear strokes. Linear strokes are lines using the top edge of the pastel which can make thin lines in the shape of hatching, cross-hatching, and stippling. Round strokes are strokes you make using the top of the pastel. Broad strokes are when you use the side of the pastel to make a wide mark.
Some additional techniques to consider when creating an image from pastel is the amount of pressure you apply when drawing. Varying the pressure will yield different results. A light stroke will transfer only a small amount of pastel to the surface allowing much of the paper to show through. Using heavy pressure will fill the tooth of the paper quickly, yielding a dense, rich stroke. Generally heavy pressure is used more towards the end of the drawing. As you build up the strokes, the stroke will evolve into implied shapes and your object will begin to emerge.
Begin your drawing by picking a landscape image. Next, pick a piece of colored pastel paper that works with your image’s color scheme. Begin drawing with a light pastel or a pastel that will blend with your color scheme. (Do not use a pencil because it will leave marks in the paper.) You may want to try out different colors on a scrap piece of paper. Don’t start with black or a dark color because it will contaminate the purity of the other colors that are applied over the top. (This is the same technique you learned with oil pastels in Art II.) Using a light pastel, begin establishing the basic shapes of your image by drawing the foreground first and work your way back to background. (This is the same technique with oil pastels in Art II.)
Continue your drawing by starting in the background and block in the color. Start by using light pastels (i.e. whites and yellows) and work your way up to darker colors and values (i.e. blacks and violets.) Add your mid-tones, and finish by adding your dark colors. Some artists do start with undertones of dark colors, but you have to be very careful using this technique because dark colors will contaminate the purity of the other colors that are applied over the top.
After you complete your background, work your way forward using the same techniques in the middle ground, and lastly, the foreground. Remember to utilize different strokes and variations of pressure for simulated texture. Remember to use the color of the paper to help you with the value and/or color of your image. For example, if you have a lighter color of paper, try to use the light color to help you create highlights. If you have a darker color of paper, try to use the color of the paper to help you create shadows. When you are done with a section, or when you are done with your drawing, spray fixative over your drawing.
Before turning in your project for grading, you will apply formal critique steps to reflect on your artwork. You make the necessary changes to improve your artwork.
Want to learn more about other artists using pastels? Look up pastel drawings by Mary Cassatt, William Merritt Chase, Jean Francois Millet, and Edgar Degas or check out the following books:
Baggetta, Marla. Pastel Step by Step. Irvine, CA: Walter Foster Publishing, 2004.
Picard, Alain. Mastering Pastel. Irvine, CA: Walter Foster Publishing, 2015.
Learning Objectives and Evaluation Standards
You should be able to use the following techniques to create a landscape:
- Use the paper for highlighted areas or shadows depending on the color of the paper.
- Use white or light pastels to create light values.
- Use dark pastels to create dark values.
- Layer colors for halftones.
- Use black correctly so it did not contaminate the other colors.
- Use the point and /or the side of the pastel for simulated texture.
- Use different types of pastel strokes (hatching, cross-hatching, and stippling) to create simulated texture.
Project: Still-Life Painting (30 pts)
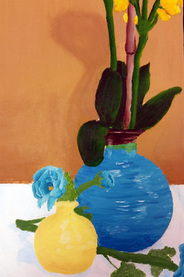
Still-life paintings first began to appear in the Netherlands and Germany, as artists used groups of fruits and flowers as part of the setting for their larger paintings. At first the studies were admired only by other artists, but gradually patrons also began to appreciate the skillful techniques used to represent sun-ripened fruits and fragrant flowers. Over time interiors were decorated with depictions of still-life subjects.
For contemporary artists, the still-life subject can become a social statement about the way we choose to live by the objects used in the still-life. Still-life is the name given to a group of objects arranged on a table or some other flat surface. The subjects are easily available and can be readily understood and recognized. Color and lighting change depending on the position of the artist in relationship to the still-life.
When you set up your still-life make sure it is in an area that it will not be disturbed. Arrange the items so they link and overlap each other. Think about the composition of the objects and how your eye flows throughout the still-life.
Begin by sketching out all the main shapes in pencil. Using acrylic paint, you are going to start with the background. Then you will work to the middle ground, and lastly to the foreground. (The opposite of dry media.) Start putting down the main colors of the background. Work over the canvas so you do not get stuck in one area. Once the main color is blocked in you may begin to concentrate on developing details of color and shape. Furthermore, select and use the correct techniques (hard edge, soft edge, painterly brushstrokes) to create simulated texture. Remember if you want a darker color, mix the color’s complement. Acrylic paint dries fast, so make sure your paintbrushes are in water when you are not using them, and also wash them out with soap and water at least three times when you are finished.
When you have completed your artwork, you will reflect by creating a written statement.
Before turning in your project for grading, you will apply formal critique steps to reflect on your artwork. You make the necessary changes to improve your artwork.
Want to learn more about mixing paints and painting techniques in acrylic paint? Check out the following books:
Mirza, Jill and Nick Harris. Mix Your Own Acrylics. New Jersey: Chartwell Books, 1995.
Reyner, Nancy. Acrylic Innovation. Cincinnati, Ohio: North Light Books, 2010.
Sidaway, Ian. Color Mixing Bible. New York: Watson-Guptill Publications, 2002.
Learning Objectives and Evaluation Standards
- You should be able to select and use paint expressively (hard edge, soft edge, and /or painterly brush strokes.)
- You should be able to mix colors to match observed hues.
- You should be able to identify and use a range of colors/values to create the illusion of form and space.
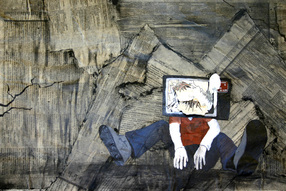
Project: Cardboard Relief Painting (30 pts)
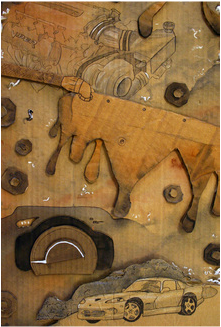
Your project will be based on the concept of the inside and outside of an object. You will create a relief using cardboard as your medium and create at least four layers to your artwork. You will pick an object that can personally relate to. You will use a 12” by 18” piece of cardboard for the base of your project. You will use pencil, charcoal, pen, sharpie, watercolor, acrylic paint, and other pieces of cardboard to create and design your layers and images. You can also cut away parts of the cardboard to create a layer. Begin by creating an image of your object from the outside. Think about how your image will relate to the composition on your project. You may want to position the outside image to become the focal point. (Think about the 1/3 rule.) You will then create and add images that represent the inside of your object. Once again, think about the composition as you add each image. Lastly, fill in negative space with color or details. Furthermore, think about creating more details by utilizing contrasting textures. As you are working through each step to construct your artwork, make sure your all of the pieces come together to creating unity within your artwork.
Your evaluation for complexity and technical skills will be based on the following:
Graphite, Charcoal, Pen, or Sharpie
Learning Objectives and Evaluation Standards
When you have completed your artwork, you will reflect by creating a written statement.
Before turning in your project for grading, you will apply formal critique steps to reflect on your artwork. You make the necessary changes to improve your artwork.
Want to learn more about artists using nontraditional materials? Look up the following artists:
Ramiro Gomez (Artwork- Lupita.)
Robert Rauschenberg (Artwork- Canyon.)
Michael Leavitt (Artwork- Corrugated Kix.)
Your evaluation for complexity and technical skills will be based on the following:
Graphite, Charcoal, Pen, or Sharpie
- Create a range of ten values.
- Create simulated or invented texture by using shading, hatching, cross-hatching, or stippling.
- Create a range of ten values.
- Create simulated or invented texture by using shading, hatching, cross-hatching, or stippling.
- Layered colored pencils to create values or different colors.
- Use of the paper for highlighted areas or areas with shadows depending on the color of the paper.
- Use of the white or light pastels to create light values.
- Use of dark pastels to create dark values.
- Layered pastel colors for halftones.
- Use of black so it did not contaminate the other colors.
- Use of the point and/ or side of the pastel for simulated texture.
- Use of different pastel strokes to create simulated texture.
- Use of the white of the paper of highlighted areas.
- Use of layered light oil pastels for highlighted areas.
- Use of layered oil pastels for mid-tones.
- Use of layered dark oil pastels for shadows.
- Use of white or light oil pastels to help blend light areas.
- Use of correct water technique (wash, wet-on-wet, and/ or wet-on-dry) for simulated or invented texture.
- Use of correct brush (round or flat) and size of the brush to create simulated or invented texture.
- Use of correct brush stroke to create simulated or invented texture.
- Use of the white of the paper for white areas.
- Add more water to pigment for lighter areas.
- Lift out wet paint by using a wet brush, sponge, paper towel for highlights.
- Lift out dry paint by using a wet brush, sponge, paper towel for highlights.
- Add more pigment and less water for darker colors or add the color’s complement.
- Create a range of eight values.
- Use of the correct brush (round, flat, or fan) and size of the brush to create simulated or invented texture.
- When appropriate apply paint to create a solid area of color.
- When appropriate blend one color or value smoothly into another color or value.
- Mix paints to create different colors and values.
- Added the color’s complement to create a darker color.
- Covered all areas of the raw canvas with paint.
Learning Objectives and Evaluation Standards
- You should be able to create an artwork based on the concept of inside/outside.
- You should be able to layer at least four layers to create a visual rhythm based on the concept of inside/ outside.
- You should be able to apply processes, media, and techniques with sensitivity to craftsmanship.
- You should be able to demonstrate high level of technical skills to communicate your ideas.
When you have completed your artwork, you will reflect by creating a written statement.
Before turning in your project for grading, you will apply formal critique steps to reflect on your artwork. You make the necessary changes to improve your artwork.
Want to learn more about artists using nontraditional materials? Look up the following artists:
Ramiro Gomez (Artwork- Lupita.)
Robert Rauschenberg (Artwork- Canyon.)
Michael Leavitt (Artwork- Corrugated Kix.)
First Semester Final: Website
Second Semester
Project: Social Commentary Collage (30 pts)
You will create a conceptual artwork based on the theme “social issues.” Your piece can be in any medium. You will begin researching different artists (such as Guerilla Girls, Banksy, Judy Chicago, and Jacob Lawrence) that focus on social issues. When you are researching the artists, look for the connections between the artworks and the social issues from that era. Next, you will look for a current article, research paper, or newspaper that focuses on a contemporary social issue. You should pick topic that you feel passionate about. Next, you will create a collage that represents your point of view on your topic. Print out or copy your article and use it in your collage. You are welcome to alter the article or paper in any form. Your collage should clearly address the social issues in a creative manner. Furthermore, remember to utilize the elements and principles to express your ideas about your topic.
Your grade for technical skills will be based on the following:
Graphite, Charcoal, Pen, or Sharpie
When you have completed your artwork, you will reflect by creating a written statement.
Before turning in your project for grading, you will apply formal critique steps to reflect on your artwork. You make the necessary changes to improve your artwork.
Want to learn more about artists addressing social issues? Look up the following artists:
Krystof Wodiczko,Mierle Laderman Ukeles, and David Alfraro Siqueiros.
Learning Objectives and Evaluation Standards
Your grade for technical skills will be based on the following:
Graphite, Charcoal, Pen, or Sharpie
- Create a range of ten values.
- Create simulated or invented texture by using shading, hatching, cross-hatching, or stippling.
- Create a range of ten values.
- Create simulated or invented texture by using shading, hatching, cross-hatching, or stippling.
- Layered colored pencils to create values or different colors.
- Use of the paper for highlighted areas or areas with shadows depending on the color of the paper.
- Use of the white or light pastels to create light values.
- Use of dark pastels to create dark values.
- Layered pastel colors for halftones.
- Use of black so it did not contaminate the other colors.
- Use of the point and/ or side of the pastel for simulated texture.
- Use of different pastel strokes to create simulated texture.
- Use of the white of the paper of highlighted areas.
- Use of layered light oil pastels for highlighted areas.
- Use of layered oil pastels for mid-tones.
- Use of layered dark oil pastels for shadows.
- Use of white or light oil pastels to help blend light areas.
- Use of correct water technique (wash, wet-on-wet, and/ or wet-on-dry) for simulated or invented texture.
- Use of correct brush (round or flat) and size of the brush to create simulated or invented texture.
- Use of correct brush stroke to create simulated or invented texture.
- Use of the white of the paper for white areas.
- Add more water to pigment for lighter areas.
- Lift out wet paint by using a wet brush, sponge, paper towel for highlights.
- Lift out dry paint by using a wet brush, sponge, paper towel for highlights.
- Add more pigment and less water for darker colors or add the color’s complement.
- Create a range of eight values.
- Use of the correct brush (round, flat, or fan) and size of the brush to create simulated or invented texture.
- When appropriate apply paint to create a solid area of color.
- When appropriate blend one color or value smoothly into another color or value.
- Mix paints to create different colors and values.
- Added the color’s complement to create a darker color.
- Covered all areas of the raw canvas with paint.
When you have completed your artwork, you will reflect by creating a written statement.
Before turning in your project for grading, you will apply formal critique steps to reflect on your artwork. You make the necessary changes to improve your artwork.
Want to learn more about artists addressing social issues? Look up the following artists:
Krystof Wodiczko,Mierle Laderman Ukeles, and David Alfraro Siqueiros.
Learning Objectives and Evaluation Standards
- You should be able to create a collage that creativity addresses a social concern with visual clarity.
- You should be able to apply processes, media, and techniques with sensitivity to craftsmanship.
- You should be able to demonstrate high level of technical skills to communicate your ideas.
Project: Ceramic Sculpture (20 pts)
You will research different sculptures that utilizes clay as a medium. We will discuss the different processes the artists used to create the artworks. Next, you will design and build a sculpture. Remember to correctly wedge the clay before beginning your sculpture. (Points will be taken off if your project breaks during the firing process.) Build up your sculpture making sure you follow these guidelines: clay should be no thicker than your thumb and no thinner than your pinky finger, all attached pieces should be slipped and scored, and lastly your initials should be carved into the bottom of your sculpture.
Before turning in your project for grading, you will apply formal critique steps to reflect on your artwork. You make the necessary changes to improve your artwork.
Want to learn more about hand-building techniques in clay? Check out the following book:
Atkin, Jacqui. Handbuilt Pottery Techniques Revealed. Canada: Barron's Educational Series, Inc., 2013.
Learning Objectives and Evaluation Standards
Project: Pottery's Wheel (5 pts)
In addition to your ceramic sculpture, you will also create a functional artwork (i.e. cup, bowl, etc.) by using the Potter's Wheel. Remember when throwing on the wheel, your goals are the form should be symmetrical and the walls are even in thickness and height. You will complete your project by using an alternative decorative finish, such as sgraffito, slip painting, incising, and/or Mishima techniques.
Want to learn more about other artists that use the Potter's Wheel to create art? Look up the following artists:
Hsin-Chuen Lin and Michael Cardew.
Learning Objectives and Evaluation Standards
Before turning in your project for grading, you will apply formal critique steps to reflect on your artwork. You make the necessary changes to improve your artwork.
Want to learn more about hand-building techniques in clay? Check out the following book:
Atkin, Jacqui. Handbuilt Pottery Techniques Revealed. Canada: Barron's Educational Series, Inc., 2013.
Learning Objectives and Evaluation Standards
- You should be able to use correct wedging and joining techniques.
- You should be able to create an artwork using a hand building process (pinch, coil, and slab) or the wheel.
- You should be able to demonstrate uniform thickness throughout the piece.
Project: Pottery's Wheel (5 pts)
In addition to your ceramic sculpture, you will also create a functional artwork (i.e. cup, bowl, etc.) by using the Potter's Wheel. Remember when throwing on the wheel, your goals are the form should be symmetrical and the walls are even in thickness and height. You will complete your project by using an alternative decorative finish, such as sgraffito, slip painting, incising, and/or Mishima techniques.
Want to learn more about other artists that use the Potter's Wheel to create art? Look up the following artists:
Hsin-Chuen Lin and Michael Cardew.
Learning Objectives and Evaluation Standards
- You should be able to create a functional artwork that is symmetric in form.
- You should be able to demonstrate uniform thickness throughout the piece.
- You should be able to demonstrate uniform height throughout the piece.
- You should be able to create an alternative decorative finish, such as sgraffito, slip painting, incising, and/or Mishima techniques.
Project: Altered Books (30 pts)
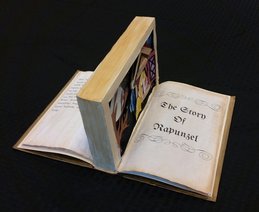
To begin your altered book project, you first need to come up with a concept. Ask yourself what do you want your viewers to understand or gain from your artwork? The concept you come up with will push you forward in how to begin to create your altered book. You are welcome to use an actual book or you can build your own book. When you select your materials, think about what the materials tell your viewer? You will add to or manipulate your book to create a narrative about your concept. The complexity of your altered book is important. Try to use many different techniques. For example, you can layer images, layer papers, fold papers to create form, roll paper to create form, cut areas away, add words, and add objects. Furthermore, you should utilize the elements and principles to express your ideas.
When you have completed your artwork, you will reflect by creating a written statement.
Before turning in your project for grading, you will apply formal critique steps to reflect on your artwork. You make the necessary changes to improve your artwork.
Want to learn about artists using found objects to create art? Look up the following artists:
Henry Moore, Marcel Duchamp, Salvador Dali, Carl Andre, and Jannis Kounellis.
Learning Objectives and Evaluation Standards
- You should be able to create an altered book that visual represents a concept.
- You should be able to utilize the following creative and complex techniques/processes to create altered book:
- When appropriate, created range of 10 values by shading, hatching, crosshatching, and/or stippling techniques
- When appropriate, mixed watercolor paints, tempera paints, acrylic paints to match observed hues.
- When appropriate, use paint expressively (i.e. hard edge, soft edge, painterly brush strokes.)
- When appropriate, use shapes and implied shapes to create a complex form.
- When appropriate, use contrast in textures.
- Use of arbitrary colors, symbolic, or color theories.
- Use of negative and positive space to create unity from all viewpoints.
Project: Blue Jay Spirit Contest (30 pts)

The Blue Jay Spirit project represents and answers the question, what does it mean to have school spirit at Jefferson R-VII. It is open to interpretation and will vary from artist to artist. The style of the project depends on the artist’s interpretation and can vary from realistic to abstract. The project provides Art III and Art IV students the possibility to have his or her artwork as a part of a permanent collection at Jefferson R-VIl. The artwork will be purchased, framed, and displayed on campus. All artworks must be two-dimensional, but any media can be utilized as long as it can be framed. After the work is finished, it will be submitted along with a written statement explaining the position or concept of the artwork. If your work is selected, remember to update your resume. Your grade for technical skills will be based on the following guidelines:
Graphite, Charcoal, Pen, or Sharpie
Colored Pencils
Pastel
Oil Pastels
Watercolors
Acrylic Paints
When you have completed your artwork, you will reflect by creating a written statement. You will write one paragraph explaining the concept of your artwork (Blue Jay Spirit.) Remember you should have a topic sentence, chunks of information supporting your topic sentence, and a concluding sentence. Please print it out and turn in with your project for judging.
Before turning in your project for grading, you will apply formal critique steps to reflect on your artwork. You make the necessary changes to improve your artwork.
Learning Objectives and Evaluation Standards
Graphite, Charcoal, Pen, or Sharpie
- Create a range of eight values.
- Create simulated or invented texture by using shading, hatching, cross-hatching, or stippling.
Colored Pencils
- Create a range of eight values.
- Create simulated or invented texture by using shading, hatching, cross-hatching, or stippling.
- Layered colored pencils to create values or different colors.
Pastel
- Use of the paper for highlighted areas or areas with shadows depending on the color of the paper.
- Use of the white or light pastels to create light values.
- Use of dark pastels to create dark values.
- Layered pastel colors for halftones.
- Use of black so it did not contaminate the other colors.
- Use of the point and/ or side of the pastel for simulated texture.
- Use of different pastel strokes to create simulated texture.
Oil Pastels
- Use of the white of the paper of highlighted areas.
- Use of layered light oil pastels for highlighted areas.
- Use of layered oil pastels for mid-tones.
- Use of layered dark oil pastels for shadows.
- Use of white or light oil pastels to help blend light areas.
Watercolors
- Use of correct water technique (wash, wet-on-wet, and/ or wet-on-dry) for simulated or invented texture.
- Use of correct brush (round or flat) and size of the brush to create simulated or invented texture.
- Use of correct brush stroke to create simulated or invented texture.
- Use of the white of the paper for white areas.
- Add more water to pigment for lighter areas.
- Lift out wet paint by using a wet brush, sponge, paper towel for highlights.
- Lift out dry paint by using a wet brush, sponge, paper towel for highlights.
- Add more pigment and less water for darker colors or add the color’s complement.
Acrylic Paints
- Create a range of eight values.
- Use of the correct brush (round, flat, or fan) and size of the brush to create simulated or invented texture.
- When appropriate apply paint to create a solid area of color.
- When appropriate blend one color or value smoothly into another color or value.
- Mix paints to create different colors and values.
- Added the color’s complement to create a darker color.
- Covered all areas of the raw canvas with paint.
When you have completed your artwork, you will reflect by creating a written statement. You will write one paragraph explaining the concept of your artwork (Blue Jay Spirit.) Remember you should have a topic sentence, chunks of information supporting your topic sentence, and a concluding sentence. Please print it out and turn in with your project for judging.
Before turning in your project for grading, you will apply formal critique steps to reflect on your artwork. You make the necessary changes to improve your artwork.
Learning Objectives and Evaluation Standards
- You should be able to create an artwork that that visual represents the concept of Blue Jay spirit or having school spirit at Jefferson R-VII.
- You should be able to utilize the following creative and complex techniques/processes to create altered book:
- When appropriate, created range of 10 values by shading, hatching, crosshatching, and/or stippling techniques
- When appropriate, mixed watercolor paints, tempera paints, acrylic paints to match observed hues.
- When appropriate, use paint expressively (i.e. hard edge, soft edge, painterly brush strokes.)
- When appropriate, use shapes and implied shapes to create a complex form.
- When appropriate, use contrast in textures.
- Use of arbitrary colors, symbolic, or color theories.
- Use of negative and positive space to create unity from all viewpoints.
Project: Multi-Colored Block Printing (20 pts)
You will create a print from using the color-reduction method. In the color reduction method of printmaking, the printed images builds up in layers as the block is carved away one layer at a time. You will start with a blank linoleum block. You will draw your design or image on the block. You will begin by carving out the areas you want to be the color of the paper. Print your first color. (Use the lightest color first. You will work from lightest color to your darkest color.) Wash your block and let it dry. Continue carving the block. This time carve out the areas you want to remain the first color. Register your block by lining it up with your original print, then print the second color. Wash your block and let it dry. Carve out the areas you want to be the second color. Register your block by lining it up with your original print, then print your third color. Repeat the carving and printing until you have achieved you desired image and number of colors (or until you have removed all the linoleum from the block.) During the printmaking process, remember to think backwards, not just in terms of imagery, but also in color layering. You are always carving what you have already printed.
Before turning in your project for grading, you will apply formal critique steps to reflect on your artwork. You make the necessary changes to improve your artwork.
Want to learn more about artists using the printmaking method? Look up the following artists:
Andy Warhol, Pablo Picasso, William Blake, Hokusai, and Albrecht Durer.
Learning Objectives and Evaluation Standards
- You should be able to create a complex design for a block print.
- You should be able to demonstrate a printmaking process that requires registering.
- You should be able to create an edition with your block print.
Second Semester Final: Resume
